Vue Routing
Routing in Vue is used to navigate the Vue application, and it happens on the client side (in the browser) without full page reload, which results in a faster user experience.
Routing is a way to navigate, similar to how we have used dynamic components earlier.
With routing we can use the URL address to direct someone to a specific place in our Vue application.
Navigate Using a Dynamic Component
To understand routing in Vue, let's first look at an application that uses a dynamic component to switch between two components.
We can switch between the components using buttons:
Example
FoodItems.vue:
<template>
    <h1>Food!</h1>
    <p>I like most types of food.</p>
</template>
AnimalCollection.vue:
<template>
    <h1>Animals!</h1>
    <p>I want to learn about at least one new animal every year.</p>
</template>
App.vue:
<template>
  <p>Choose what part of this page you want to see:</p>
  <button @click="activeComp = 'animal-collection'">Animals</button>
  <button @click="activeComp = 'food-items'">Food</button><br>
  <div>
    <component :is="activeComp"></component>
  </div>
</template>

<script>
export default {
  data() {
      return {
        activeComp: ''
      }
    }
}
</script>

<style scoped>
  button {
    padding: 5px;
    margin: 10px;
  }
  div {
    border: dashed black 1px;
    padding: 20px;
    margin: 10px;
    display: inline-block;
  }
</style>
From Dynamic Component to Routing
We build SPAs (Single Page Applications) with Vue, which means that our application only contains one *.html file. And that means we cannot direct people to other *.html files to show them different content on our page.
In the example above, we can navigate between different content on the page, but we cannot give someone else an address to the page so that they come directly to the part about food, but with routing we can do that.
With routing set up appropriately, if you open the Vue application with an extension to the URL address, like "/food-items" for example, you will come directly to the part with the food content.
Install The Vue Router Library
To use routing in Vue on your machine, install the Vue Router library in your project folder using the terminal:
npm install vue-router@4
Update main.js
To use routing we must create a router, and we do that in the main.js file.
main.js:
import { createApp } from 'vue'
import { createRouter, createWebHistory } from 'vue-router'

import App from './App.vue'
import FoodItems from './components/FoodItems.vue'
import AnimalCollection from './components/AnimalCollection.vue'

const router = createRouter({
    history: createWebHistory(),
    routes: [
        { path: '/animals', component: AnimalCollection },
        { path: '/food', component: FoodItems },
    ]
});

const app = createApp(App)

app.use(router);
app.component('food-items', FoodItems);
app.component('animal-collection', AnimalCollection);

app.mount('#app')
Lines 2, 8-14 and 18 are added to add router functionality.
Lines 19-20 are deleted because the components already get included via the router on lines 11-12.
We have now created a router that can for example open the 'AnimalCollection' component if '/animals' is added to the end of the original URL address, but it won't work until the next section when we add the <router-view> component. The router also keep track of the web history so that you can go back and forwards in the history with the arrows usually located in the top left corner in the web browser next to the URL.
Use The <router-view> Component
To change the content on our page with the new router, we need to remove the dynamic component in the previous example and use the <router-view> component instead.
App.vue:
<template>
  <p>Choose what part of this page you want to see:</p>
  <button @click="activeComp = 'animal-collection'">Animals</button>
  <button @click="activeComp = 'food-items'">Food</button><br>
  <div>
    <router-view></router-view>
    <component :is="activeComp"></component>
  </div>
</template>
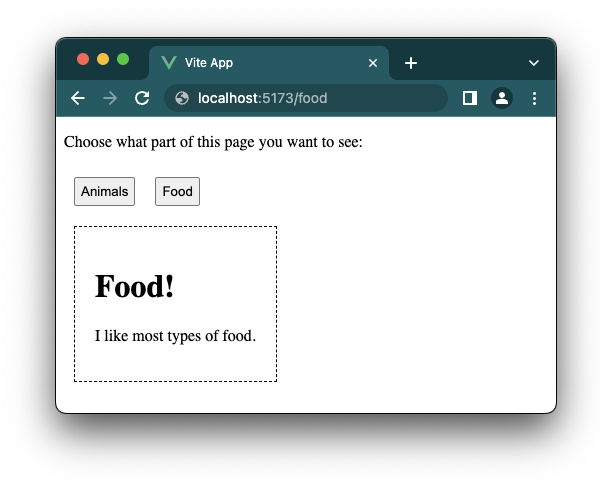
If you have done the change above on your computer you can add '/food' to the URL address of your project page in the browser, and the page should update to show the food content, like this:
Use The <router-link> Component
We can replace the buttons with the <router-link> component because that works better with the router.
We have no need for the 'activeComp' data property anymore, so we can delete it, and we can actually delete the whole <script> tag, because it is empty.
App.vue:
<template>
  <p>Choose what part of this page you want to see:</p>
  <router-link to="/animals">Animals</router-link>
  <router-link to="/food">Food</router-link><br>
  <div>
    <router-view></router-view>
  </div>
</template>

<script></script>
Style to The <router-link> Component
The <router-link> component is rendered to an <a> tag. We can see that if we right-click the element in the browser and inspect it:
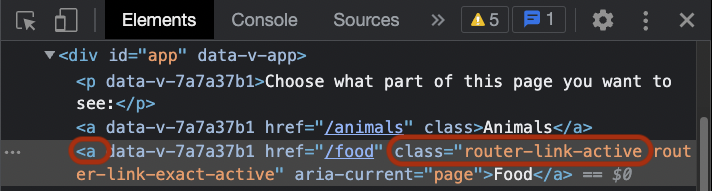
As you can see in the screenshot above, Vue also keeps track on which component is the active one, and provides the 'router-link-active' class to the active <router-link> component (that is now rendered to an <a> tag).
We can use the information above to give style to highlight which <router-link> component is the active one:
Example
App.vue:
<template>
  <p>Choose what part of this page you want to see:</p>
  <router-link to="/animals">Animals</router-link>
  <router-link to="/food">Food</router-link><br>
  <div>
    <router-view></router-view>
  </div>
</template>

<style scoped>
  a {
    display: inline-block;
    background-color: black;
    border: solid 1px black;
    color: white;
    padding: 5px;
    margin: 10px;
  }
  a:hover,
  a.router-link-active {
    background-color: rgb(110, 79, 13);
  }
  div {
    border: dashed black 1px;
    padding: 20px;
    margin: 10px;
    display: inline-block;
  }
</style>
Note: In the example above, the URL address is not updated, but if you do this on your own machine the URL address will be updated. The example above works even if the URL address is not updated because the routing is taken care of internally by the router in Vue.